


Speed ramping means progressively changing the speed of a video clip over time. While it’s often used in sports highlights, adjusting speed can be effective for many types of footage. No matter how you use it, a speed ramp is a great addition to your video-editing tool kit.
Today, Motion Array will walk you through everything from capturing the right footage to advanced tips and tricks. You’ll also see ideas and inspiration for when to use a speed ramp. In this tutorial, you’ll learn all about speed ramping in Premiere Pro — and unlock a whole new world of creativity. Let’s get started.
Summary
Breaking down speed ramping in Premiere Pro and other programs
Speed ramping, also known as time remapping, is a powerful technique in video editing that lets editors dynamically alter the playback speed of footage within a single shot. This effect can be used to create visually striking transitions, emphasize key moments, or add a stylistic flair to video content.
The primary reasons for using speed ramping include:
- Enhancing visual storytelling: By speeding up or slowing down specific parts of a clip, editors can guide the viewer’s attention and create a more engaging narrative flow.
- Creating a dramatic effect: Sudden changes in speed can evoke emotions like tension, excitement, or contemplation.
- Highlighting important details: Slowing down crucial moments allows viewers to absorb more information or appreciate subtle nuances.
- Stylistic expression: Speed ramping has become a signature technique in music videos, action sequences, and sports highlights.
Modern video-editing software like Adobe Premiere Pro, Final Cut Pro, and DaVinci Resolve offer built-in tools for speed ramping, making this technique accessible to both professional and amateur editors. But mastering speed ramping requires practice and a keen eye for timing and pacing to achieve the desired impact without disorienting the viewer.
Now you know more about how (and why) to use speed ramping in Premiere Pro, it’s time to create your first speed ramp.
Part 1: Create a simple speed ramp in Premiere Pro
For this example, Motion Array used our DJ clip (as in the earlier video). You can use any clip you’d like to add a speed ramp to, but feel free to try this one and follow along.
Before beginning any work, click and drag to increase the height of the video track in the timeline. This will ensure that you can see the speed ramp properly in the next steps.
Pro Tip: If you’re working within a sequence of clips, you can also choose to drag the clip to a new track while you work. Speed changes will affect the length of the clip, so this is good practice.
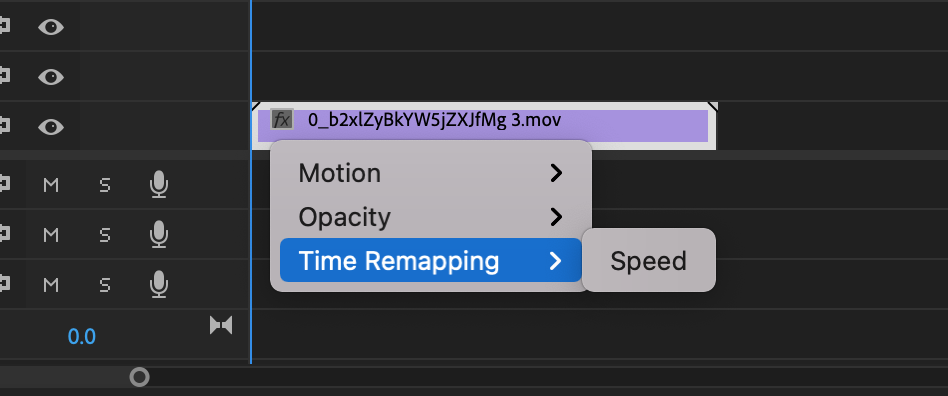
- Right-click the Fx button on the clip. From here, head to Time Remapping > Speed.
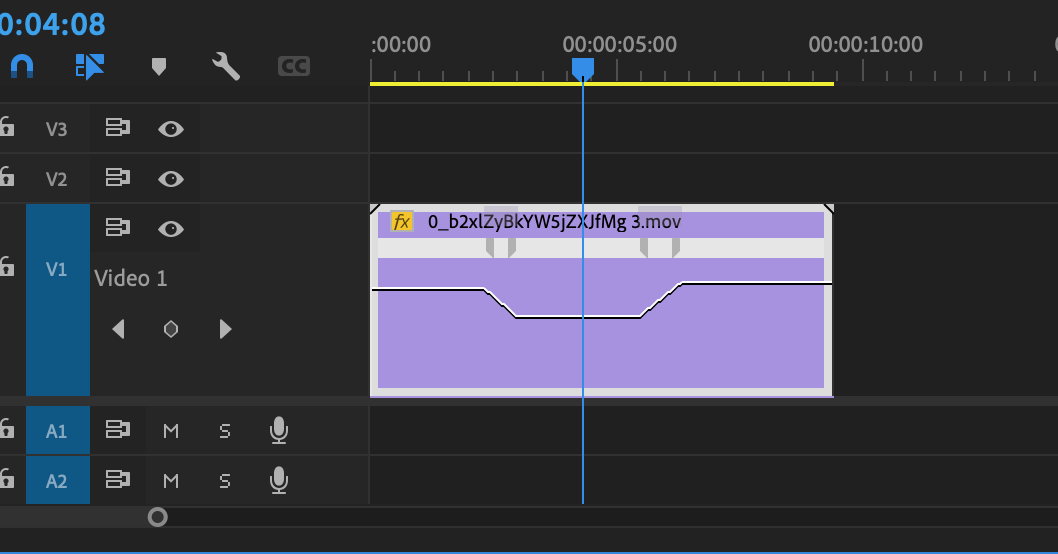
- The rubber band across your clip now represents the speed of the clip. This has changed from the default, which is Opacity.
- Dragging this band up or down will change the speed. If you’re starting with a slow-motion clip, drag the band up (typically to about 250%-300%) to begin with the clip at normal speed.
- To create a speed ramp, you’ll need to add keyframes, so Ctrl+Click or Cmd+Click the rubber band.
- Add 2 keyframes, dividing the clip into 3 parts. Click and drag the middle section up (faster motion) or down (slower motion).
Pro Tip: Keyframes can be manipulated both in the timeline and in the Effect Controls panel.
- When you play back the clip, you’ll notice the speed change is abrupt — more of a cut than a ramp.
- Click and drag each keyframe to split it, creating a gradual speed change instead.
If you need to reposition the entire keyframe, you can use Alt or Option and drag the keyframe. Be sure to play around with different lengths until you’re happy with how your speed ramp looks.
While those are the basics of speed ramping in Premiere Pro, you need some finesse and practice to create great-looking effects. Much of it comes down to making a good match between the footage frame rate and the ramp. Next, you’ll look at frame rates in more depth.
Part 2: Understanding frame rates when working with speed
It’s essential to understand frame rates when working with video speed. Videos are typically shot and played back at 24 or 30 fps. Slow motion is created by shooting at a higher frame rate (like 60 fps) and playing it back at lower frame rates. Remember that you’ll need to correctly re-sync the audio or add sound effects, as this slowdown will affect audio and video.
Time remapping is the technical term for playing footage back at a different frame rate than when it was shot. But what if you want to create a slow-motion shot or a speed ramp like the example above, however you didn’t shoot your footage at a high frame rate? Premiere Pro will try to fill in the missing frame information automatically.
Artificial slow motion often looks choppy, however. So, if you plan to use a speed ramp to highlight action, it’s always best to shoot the slow-motion footage in-camera with the extra frames in place. You can learn more about shooting slow motion in-camera if you’d like to try it.
But if you’ve already shot your video, you can still create a slow-motion effect in Premiere Pro. You’ll simply need to play around with the settings to get the best results possible, then you can render your hard work.
Part 3: Advanced speed ramping techniques
1. Keyframe interpolation
A speed ramp has keyframes marking the speed change’s starting and ending points. This is where Premiere Pro must fill in extra frames.
Keyframe interpolation is the process of filling in the values between those 2 points. Simply dragging to split the keyframe, like you did in the last example, creates an even speed increase between the keyframes. This is called linear interpolation.
You can use Bezier interpolation for a smoother and more natural speed ramp. With Bezier interpolation, the rate of the speed increase will also accelerate. Select a keyframe and click and drag the Bezier handles to create an S-curve. Adjust until you’re happy with the results.
2. Speed ramp transition
Up to this point, we’ve used Premiere Pro speed ramps in one continuous shot. This is how you create slow-motion ‘pauses’ in a single action sequence. However, you can also use this technique, or a speed ramp preset, in Premiere Pro to create interesting transitions.
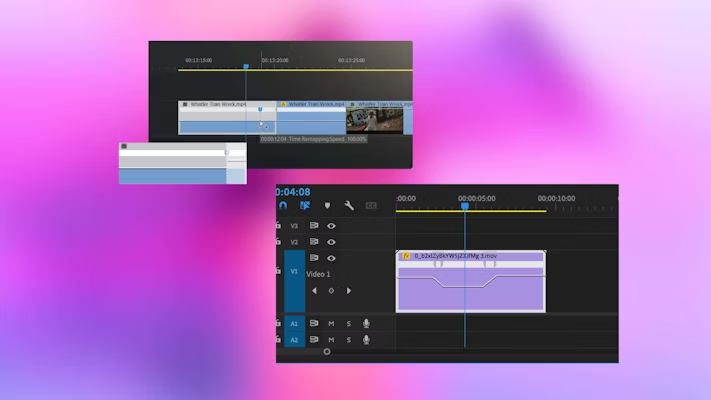
Here, the clip speed will ramp up at the end of a clip and then into a cut. In the second clip, the speed will start fast and ramp down to create a smooth transition. This technique can be used to show the passage of time, depict a character’s disorientation, or add flair to a marketing video.
Check out the below example using Motion Array’s Scared Girl in Woods and Girl Wakes in Woods clips.
To get this effect in Premiere Pro, create a ramp-up at the end of your first clip and a ramp-down at the beginning of your second clip. The speed rubber band will resemble a bell curve covering the 2 clips.
3. Motion blur
When you’re playing with speed ramps in your videos, you might notice it doesn’t always look quite right — even if you’ve carefully matched everything and used the correct interpolation method for the clip. That’s where motion blur comes in to save the day!
Think of motion blur as the streaky effect you see when you take a picture of something moving really quickly. It makes fast things look smooth and realistic instead of jumpy. When you speed up your video, adding motion blur can make it appear more natural and less like a robot filmed it — or like you created it in post!
On the flip side, when you slow things down, a touch of blur can make your footage feel dreamy and cool, like the awesome slow-mo shots you see in movies. The trick is finding the sweet spot: not too blurry, not too sharp. Play around with motion blur and see what looks best to you.
In Premiere Pro, you can add motion blur to speed-ramped clips using the Time Remapping effect:
- After applying speed changes, go to the Effect Controls panel and look for the Time Remapping section again.
- You’ll find an Enable Time Remapping checkbox and a Shutter Angle slider.
- Check the box to turn on motion blur, then adjust the Shutter Angle to control the intensity of the blur.
- A higher angle (like 180-360 degrees) will create more blur, while a lower angle (below 180 degrees) will keep things sharper.
- Experiment with these settings to find what feels best for your footage.
Motion blur will give a nice pop of realism to your Premiere Pro speed ramps.
Creating speed ramps in Premiere Pro can add function and style to almost any video, from narrative features to social media posts. Premiere Pro makes creating and refining speed in the timeline simple, so play around until you’re happy. Remember, Motion Array has plenty of other Premiere Pro tutorials for you to enjoy, too.


